Build a Linux cluster for under $2500. That is crazy -- or maybe not. Join Doug and Jeff as they undertake this outrageous project.
Keeping an eye on hardware prices is essential if you want to become a certified cluster geek. Remember those gigabit Ethernet switches that cost an arm an a leg, or how about those DDR DIMMs. Today those price seems to be a bit more in reach. Perhaps the extreme in low prices, came when Walmart introduced a $200 PC built from "value parts" (i.e. very low cost PC hardware). Some quick math says, an eight node cluster could be built for less than $2000 and gigabit Ethernet could be added for another $500 and presto, you have yourself a cluster.
You're Joking Right?
Most cluster procurements start with a fixed budget amount. This number is the first design constraint. The goal is to pack as much performance and functionality into your budget. Both hardware and software choices will play out in this scenario. So what if instead of having $250,000 or $25,000 for your cluster budget, you had $2500?
Regardless of the amount of money, building a cluster is an interesting optimization problem and a $2500 cluster would also make for a good story based on the shear absurdity of the idea. But, maybe it is not so crazy and the answer to the question "Surely such a cheap cluster cannot be used for anything useful?" is like all cluster questions -- It depends.
A low cost, personal cluster has some advantages. First, in an educational environment, it is an inexpensive way to learn the art of clustering. Second, a small personal system is great for software development and experimentation. There is no need to tie up production systems with these kinds of tasks. Third, while you will not make the Top500, you will probably have more computing power and memory than your desktop currently provides. And finally, speaking as cluster geeks, it is just has to be done.

| Sidebar One: Thank you AMD! |
| The authors wish to thank AMD for supporting this project. In particular for not laughing in our faces when we suggested the idea. |
Kronos Is Thy Name
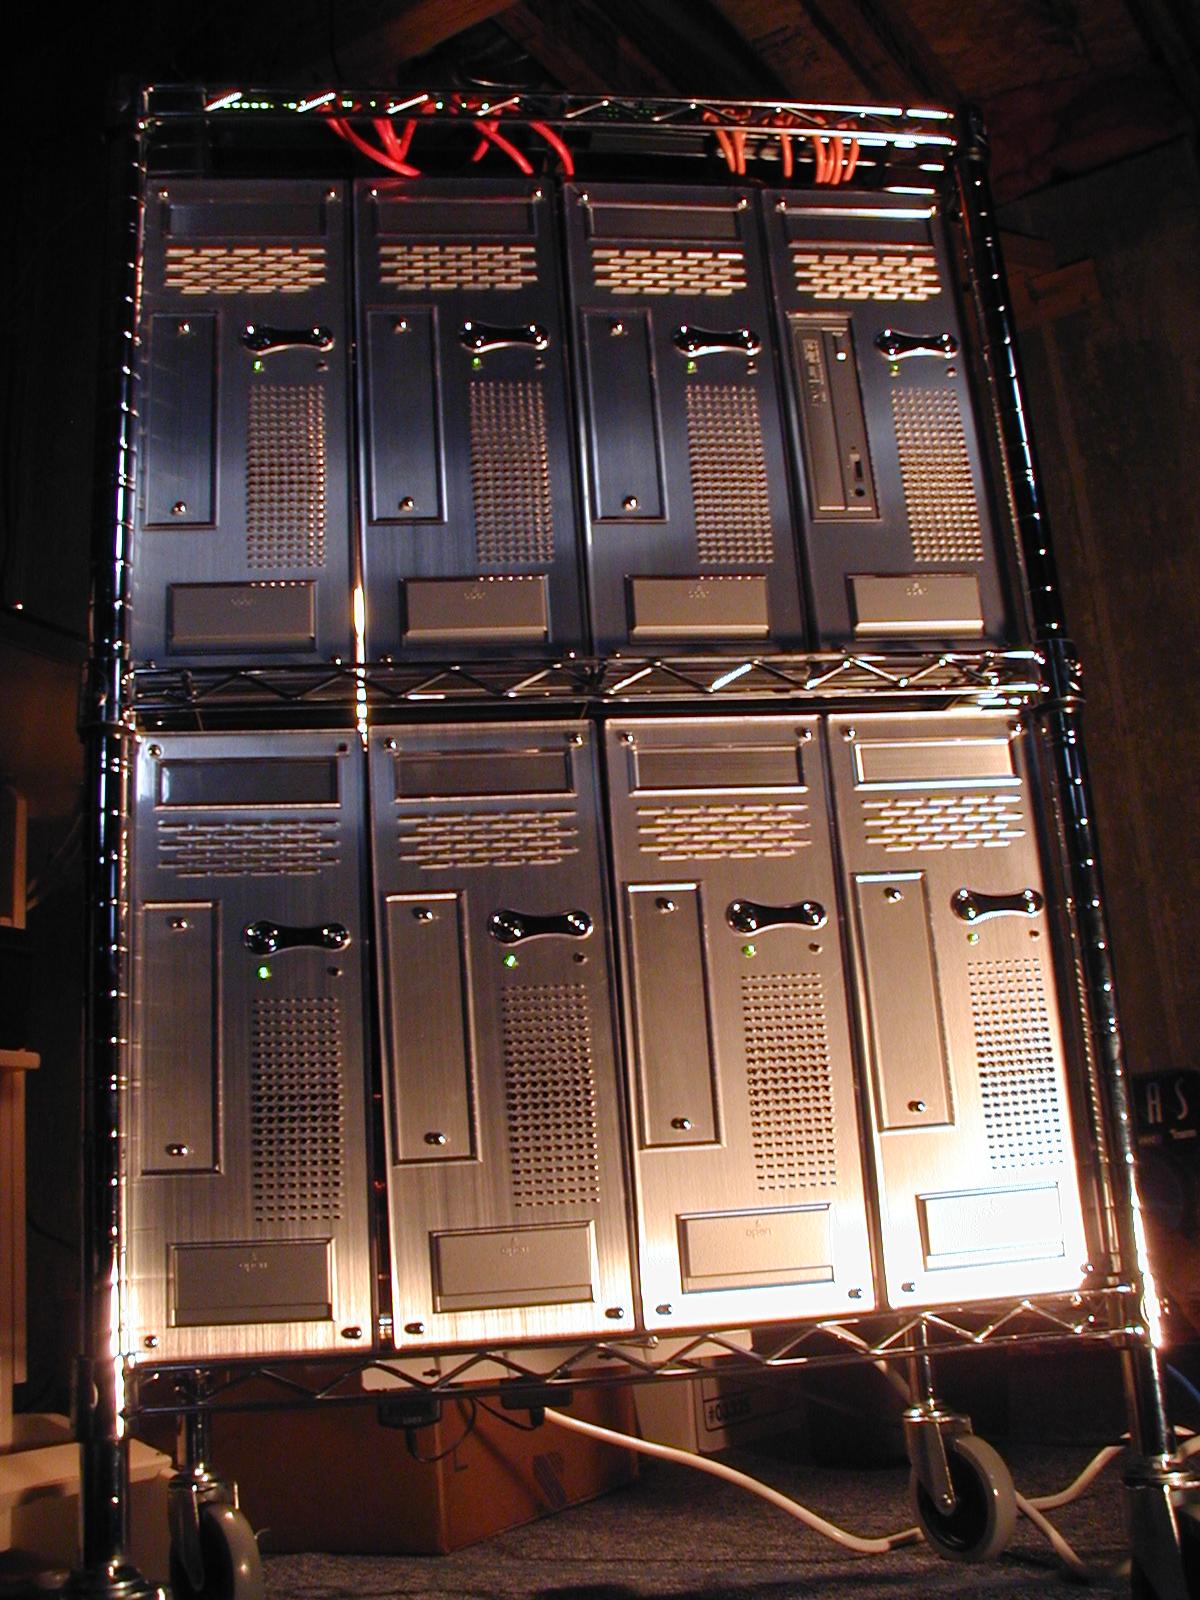
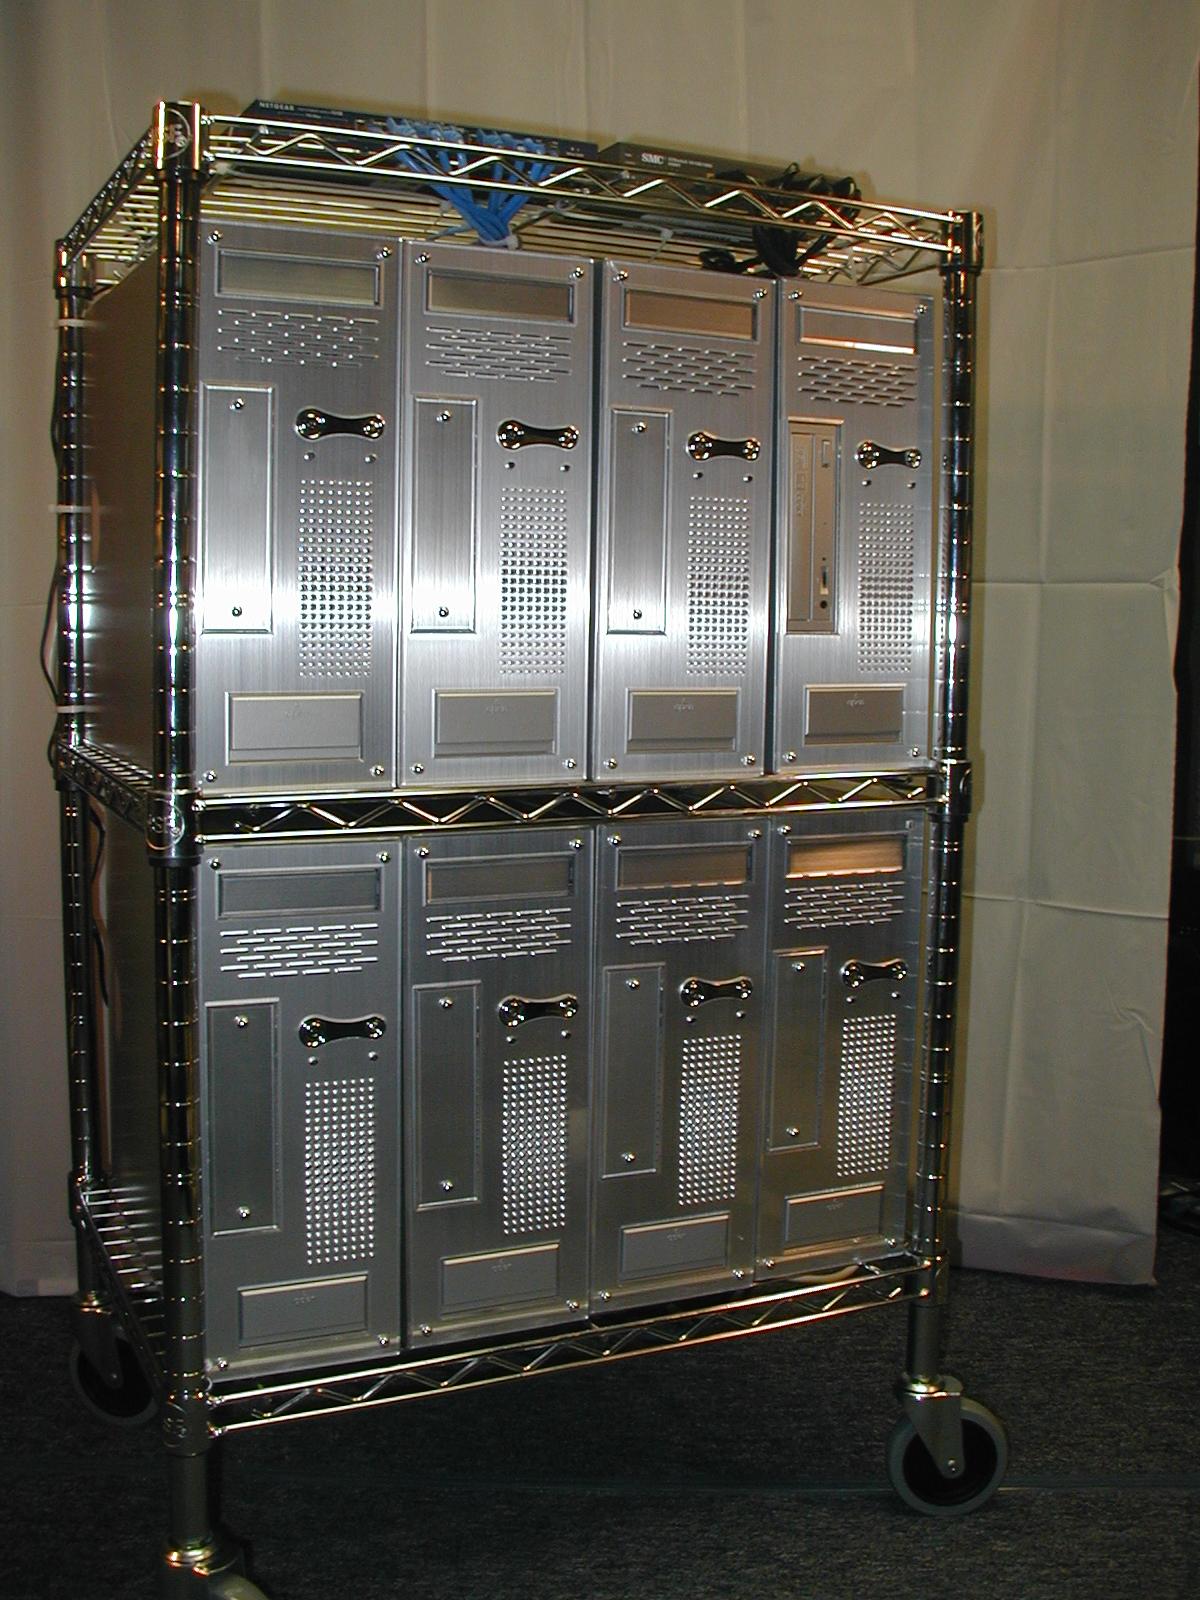
So what does this cluster look like? You can see it in Figure One below. Since the picture kind of reminds us of an old Sci-Fi movie called KRONOS, We thought it would make an appropriate name. The original KRONOS is shown to the right.
Kronos is a complete eight node cluster with eight Sempron 2500 processors (and nice shiny silver cases). The head node has 512 MByte of RAM (PC2700), 64MB AGP Video card, a DVD/CD Reader/Burner, 160 GBytes of RAID 1 storage, two FastE links, and one GigE link. The nodes have 256 MBytes of RAM (PC2700), a FastE link, and a GigE link. The nodes are intentionally disk-less because we are using the Warewulf toolkit on top of Fedora Core 2. We use two Ethernet switches, an eight port FastE and and eight port GigE (with jumbo packet support). Yes, all this for $2500.
Rules of the Game
Before we get into the details, here are the rules of our project.
- Spend no more than $2500 to build a small cluster.
- Use only screwdrivers and maybe some needle nose players, but no fancy skills are required.
- All hardware must be purchased "off the shelf" and be readily available from several sources.
- Use only freely available software.
While these rules may be hard to live with at times, they ensure, that the system will have minimum cost and easy construction. If you are playing along at home, you may wish to increase the budget and add faster CPUs, more memory, or nodes. But remember, if you get to far off the track, we cannot help you with any incompatibilities you find. As with most cluster projects the devil is in the details.
The Master Plan
This article is the first part in a 3-part series on building and testing your own Linux cluster. In essence, it is a recipe for building a cluster. As we move through the series, we will reveal our thinking and decision making process for low cost hardware. Much of the thought process should be similar for larger clusters as well. We will not get into environmental considerations nor will we concern ourselves with density issues (i.e. the size of the cluster is largely determined by the smallest low cost case we can find.)
This first installment will cover the design, hardware components, and assembling the hardware. The next two parts will be:
At the conclusion of the series we expect to revisit the cluster to demonstrate a concept, run an application, or even upgrade the system. We may also use Kronos to demonstrate other concepts or application software.
Eye On the Prize
To provide some incentive, Figure One (A large version of Figure One can be found here.) shows the completed cluster. Aside from the sexy silver appearance, you will notice there is no monitor or keyboard (optional if you need them). While certainly not a desk-top system, and maybe not even desk-side system, it is highly maneuverable and capable of being powered by standard office/home electrical service. The entire cluster measures, 40 inches (102 cm) high, 24 inches (61 cm) wide, 18 inches (46 cm) deep. It is also quite mobile.
We should also mention that we are not really pioneers in this area. The Aggregate.org crew (aggregate.org) had previously built the low cost KASY0 (Kentucky ASYmmetric Zero, pronounced "Kay-See Zero"). The KASY0 cluster cost around $300 per node and was the first cluster to break the $100/GFLOPS threshold. As of August 22, 2003, KASY0 also holds the record for POV-Ray 3.5 rendering speed.

| Sidebar Two: The Walmart Cluster |
| Walmart sells very inexpensive desktop systems. Initially we considered using these systems as a basis for a cluster. Indeed, we actually purchased a few systems. We found two issues with this approach. First, at the "value" price point, there is no guarantee you will get all the same system components. This situation was considered too unpredictable and could lead to incompatibilities and unforeseen problems. Second, the systems were not exactly what we wanted and thus would reduce our flexibility. And, by the way, Eadline's daughter likes her Walmart computer just fine. |
Ready, Set, Go
So where to begin. Let's flesh out a general goal and see if we can fit in our budget. First, we figure it will be a 32-bit cluster with single CPU motherboards, dual systems or 64-bit hardware are still a little to expensive for our budget. Since most inexpensive Ethernet switches have eight ports, we'll shoot for a node count of eight. We would also like to have 256M of memory on the compute nodes, and 512MB on the head node. Gigabit Ethernet (with Jumbo packet support) would also be a big addition although we understand it will be constricted by a 32-bit PCI bus. This design sounds reasonable, but before we go to the web and start looking up prices lets settle on some other design criteria.
One way to save money and power, is to make the nodes diskless. The smallest hard drives cost about $50, which is about the cost of a 32-bit Gigabit Ethernet card. Plus we really don't want the hassle of "diskfull" cluster management. After some deliberations, we decided the RAM disk based Warewulf package seems like the best solution. Warewulf still needs an underlying distribution, which is another decision point. After still more deliberation, we chose Fedora Core 2 (Fall of 2004). While there are many other Red Hat derived distributions, we think the Fedora distribution has enough supporting information to allow us to refer questions to books, web-pages, and mailing list when problems arise. We will talk more about these issues in the future when we get started with the software.
Our target design is shown in Figure Two. Because most systems come with on-board Fast Ethernet, we will design two networks for the cluster -- a low speed Fast Ethernet (FastE) and high speed Gigabit Ethernet (GigE). As shown on the figure, if you plan on connecting the cluster to local network the head node will need an additional Ethernet NIC.
In summary we need a master node with a single processor, 512MB memory, video card, hard drive, and three network controllers (two FastE and one GigE). We also would like a DVD drive, but no floppies. The nodes require a single processor, video card, 256MB memory, and a GigE NIC.

Details, Details
Some other details need attention. It is important that you have motherboards that can boot without keyboards. Also, they should have the ability to reboot from a power loss without hitting the power button. This feature is important if you want to control the power from a plug strip. In addition, Wake-on-Lan will be a very helpful feature allowing the head node to powerdown and power up the worker nodes automatically. Another feature that you may never use, but may come in handy for diagnostics is the ability to boot from a USB floppy.
We would also like the motherboards to have some on-board features like networking and video. Finally, we need a small case has that has front to back airflow. Some cases have side airflow which limits the ability to stack systems close together.
Low Cost DIY Hardware
We have chosen the option to of building our own hardware. This choice has two advantages. First, we will get more for our money because we are providing the sweat equity of assembling the systems. Second, we can pick exactly what we want in the systems. Since the cluster we are designing has only 8 nodes, and the worker nodes are quite sparse the time for building them isn't too great. As any true geek would attest, touching the components, putting them together correctly, seeing the fruits of your labor are things that we relish about building our own systems.
There are many mail order companies that offer very good systems and parts backed with good warranties. There are also a number of websites that track prices of various products across mail order websites. Sites such as pricewatch.com, pricegrabber.com, froogle.com, provide good sources of prices and mail order companies. To compliment these websites, are other websites that allow people to "rate" the mail order companies they buy from. Sites such as resellerratings.com are useful for reading the inputs of users and getting an idea about the quality of the company.
For this article series we have chosen (and tested) the exact components we need. You can of course substitute you own and provided you stick close to our recipe, be successful as well. If you are using your own hardware, you may want to test one or two systems before you hit the buy button for eight nodes.
Our Choices and Rationale
Sidebar Three is detailed list of our hardware choices along with approximate prices. Please note that if you are on a budget, you can easily do a lesser number of nodes. We are proud to say that after some searching and twiddling with the design, we managed to stay within our budget and our design specifications.
Arguably our parts list in the sidebar represents one of many solutions. We realize the design may be optimized further by choosing other hardware, but we had to stop cutting bait and start fishing at some point. To show that we did put some thought into the hardware, we will provide some insights into our design process. Keep in mind, cost, availability, and heat were some of the most important factors guiding our decisions.
The choice for processor was between Sempron and Celeron D. We decided to go with Semprons as they are low cost reincarnations of the Athlon XP processor. We also chose to buy "retail" version of the processor that included an AMD approved cooler.
We chose the ASRock Micro-ATX motherboard based largely on price. As we understand, ASRock motherboards are made by ASUS. The one feature we liked is the ability of the motherboard to shut down if it senses CPU overheating. Clearly intended for the over-clocking crowd, this feature is good to have in the event that a CPU fan decides to stop working. The motherboard also has the ability to do Wake-on-Lan, PXE boot, and supports USB floppy booting. The only drawback is the use of 64MB of main memory for video RAM (The BIOS reserves 64MB of RAM for video). This technique is used on almost all "value" motherboards, so we consider a standard feature. It does have its advantages, because, when you have problems, video output is nice. If you use an AGP video card, as we did in the head node, the BIOS gives back the RAM. One of the other things we give up at this hardware level is option to use ECC memory. There is nothing like living on the edge.
Surprisingly, the case was one of the hardest things to find. The Super Flower model SF-101 was one of the best bargains we have found. The case is small (made for Micro-ATX boards), includes a power supply, can hold two hard drives, a DVD/CD drive, and a floppy. It also has bays for two micro hard drives (the kind used in laptops). The case is well made and is one of the few low cost cases that does not have sharp edges.
Since we are eliminating hard drives from the nodes, we decide to splurge a bit on the head node. We are using two 160 GB low power drives from Hitachi. We will probably use these as a RAID-1 mirror, but you could optionally configure them as a 320 GB RAID-0 device.
As far as the GigE NIC, we would have liked to used the Netgear GA302T, but it seems that these are near their "end-of-life" as they are hard to find. If you recall, in a previous article Eadline benchmarked these NICs and at $32, the performance was quite exceptional (35 us latency, 800 Mbits/second). Because availability of parts is important (See rule three above), we chose the Intel PRO/1000 MT. We'll have more on the performance of this NIC next time.
We chose a low cost AGP card for the head node and invested money in a good DVD reader/burner. The really cool thing about the DVD is that it supports vertical loading so we can orient the head node either vertically or horizontally. We also selected a low cost ($9) NIC for the local network (Remember when FastE NICs cost hundreds of dollars!)
Finally, we chose the FastE Ethernet switch based on cost. For the GigE switch we made sure the SMC 8505T had jumbo frame support. Most low cost switches use the same internal chipsets, so we assume performance will be about the same in this price range.
If we tally up the cost, we find that we are at $2490. There are some extras you may wish to purchase. If you do not have shelf space available, We highly recommend using the wire rack with wheels shown in Figure One. While the bottom row of cases is a tight fit, the rack is an otherwise perfect fit. The wheels are very important for two reasons. First, when running the wires, being able to turn the cluster makes the job much easier. Second, if you are going to want to move the cluster, it is really too heavy to lift on your own.
We also left the power distribution as an option as this will be determined by how you physically locate the systems. We do provide the wiring diagram we used in Figure Four.
Another option that can be useful is a USB floppy. Many people have these already, so we considered it optional. If the USB floppy is plugged in the front or the back of the case, the BIOS will list it in the Boot Menu (press F11 when booting). If you need to run something like Memtest-86 on any of the nodes, this can be real handy.
Lastly, in sticking with rule number two (use only screwdrivers), get some zip strip wire ties. In addition to collecting wires with these, we also use them to fasten things to the shelves.
| Sidebar Three: Component List | ||||||||||||||||||||||||||||||||||||||||||||||||
|
The following are the prices we paid for the various hardware components in the Fall of 2004. Faster processors and bigger hard drives can probably be purchased for the same price today.
Prices can vary on a daily bases and hopefully you may find some may to
be a bit less than we found. Specific model numbers are provided were
applicable.
The above prices do not include shipping. We have found, directron, newegg.com, and buy.com to be good sources for parts. You may wish to consult pricewatch, pricegrabber, or froogle and search for the lowest prices. Make sure you check the vendor ratings at resellerratings. Optional Items Since everyone's environmental requirements may not be same, we left some of the infrastructure requirement up to the user. (i.e. you may chose to stack your nodes on an existing shelf). We highly recommend using a mobile wire rack like the one pictured in the figures. After some searching, we were able to find this shelf unit that fits 8 of the Super-Flower cases perfectly. We purchased it at a local Lowes Home Improvement store and have since noticed it on their website. Look for a "Shelving By Design 3 Tier Stackable Chrome Wire Shelf" (Item #: 138669, Model: 3T35182436C). Make sure you buy the swivel casters as well (Item #: 1513, Model: Mp580112C). We also purchased three plug strips (See Figure Four and Figure Five). Two of the plug strips were basic six receptacle outlets with short cords (important) and no surge protection. The third plug strip was a Belkin Model F9D500-15 metal case SurgeMaster plug strip. It has six outlets, a long power cord, and room for larger AC adapters used by the Ethernet switches. Another useful option, if you do not already have one is a USB floppy. Finally, get yourself a pile of 8 inch (or ten inch) plastic zip ties for the wiring. The wire shelf makes it easy to attaching things like plug strips with plastic wire ties. |
Building the Head Node
Here is where you roll up you sleeves. If you have built PC before, you will find this process easy. It is recommend that you read though the steps below in any case. If you are a novice, you may want to get a an experience friend involved and consult some of the web sites mentioned in the Resources sidebar. We will provide an overview of the steps needed to build the nodes, but we will not cover things like how to set a jumper on the motherboard or insert DIMMs.
Always make sure you ground yourself before working with electronic equipment. Also, if you new to building PCs, here are the golden rules; don't force anything, read the manuals (like the little book that came with the motherboard), and when working on the hardware always remove power from the case by unplugging the plug at the power supply (do not just use the front panel switch). Finally, proceed at your own risk. We will not take responsibility if you hurt yourself or damage hardware. If you are unsure of the proper way to build a PC, consult a professional.
To assemble head node follow these steps:
- Push out the back plate that comes with case and insert the one supplied with the ASRock motherboard.
- Insert the memory and processor before putting the motherboard in the case. The retail processor includes a cooler that has a layer of heat sink paste already applied, make sure you line this up properly with the processor socket. Make sure you connect the processor fan. You will need to set the FSB jumper to 333Mhz. This jumper is item 27 on the motherboard layout pictured on page 3 of manual. Jumper pins 1-2 together on both posts. See page 11 of the manual for more information.
- Place the gold standoffs in the case so that they line up with the motherboard and screw down the motherboard. Make sure you use the right screws for the standoffs.
- Put the hard drive(s) and DVD drive in their respective bays. The bays are easily removed by taking out a few screws. If you are using two hard drives place each on a separate controller interface. You may need to buy an extra cable for this, make sure it is an ATA 133 cable. You may want to invest in round IDE cables as well. Obviously, the DVD will need to share a cable with one of the hard drives. You will need to set the drive master and slave settings appropriately.
- Place the motherboard in the case and line it up in the standoffs and back panel. Once it is lined up, you can screw it down. Connect the large power supply connector to the motherboard. The power supply should not be plugged in at this point.
- Connect all the cables. There are four types, power, system panel, data cables, and USB/sound front access cables. The power cables are needed for hard drives, the DVD drive, and the case fans (there are three case fans). See the manual (page 14) for the location and pin-outs of the system panel jumper. Connect the Reset, Power, Power LED, HDD LED to this jumper. You can also connect the chassis speaker as well to its jumper. If you plan on using the USB front access panel connect the black USB extension cables to the USB 2.0 connector (page 13). You will also need to connect the data cables. Ignore the audio connectors.
- Depending on where and when you buy the motherboards you may need to upgrade the BIOS. The USB floppy will come in handy here. You can download the current BIOS from the ASRock Website. If you need a boot disk, you can down load one from the FreeDos site (see Resources Sidebar).
- When everything is complete, double check your connections, and plug in the power supply. The CPU fan should start when you press the power button on the front of the case. Unplug the power supply and attach a monitor (to the motherboard video connector) and keyboard to see that the system is booting properly (you can enter the BIOS by pressing F2). If the system does not start up, recheck everything, and try again.
- Add the AGP video and network cards. Once you install the video card, the motherboard video will no longer work. Make sure your connect the monitor to the video card or you will be wondering what happened to the video signal. (Of course we never did that!)
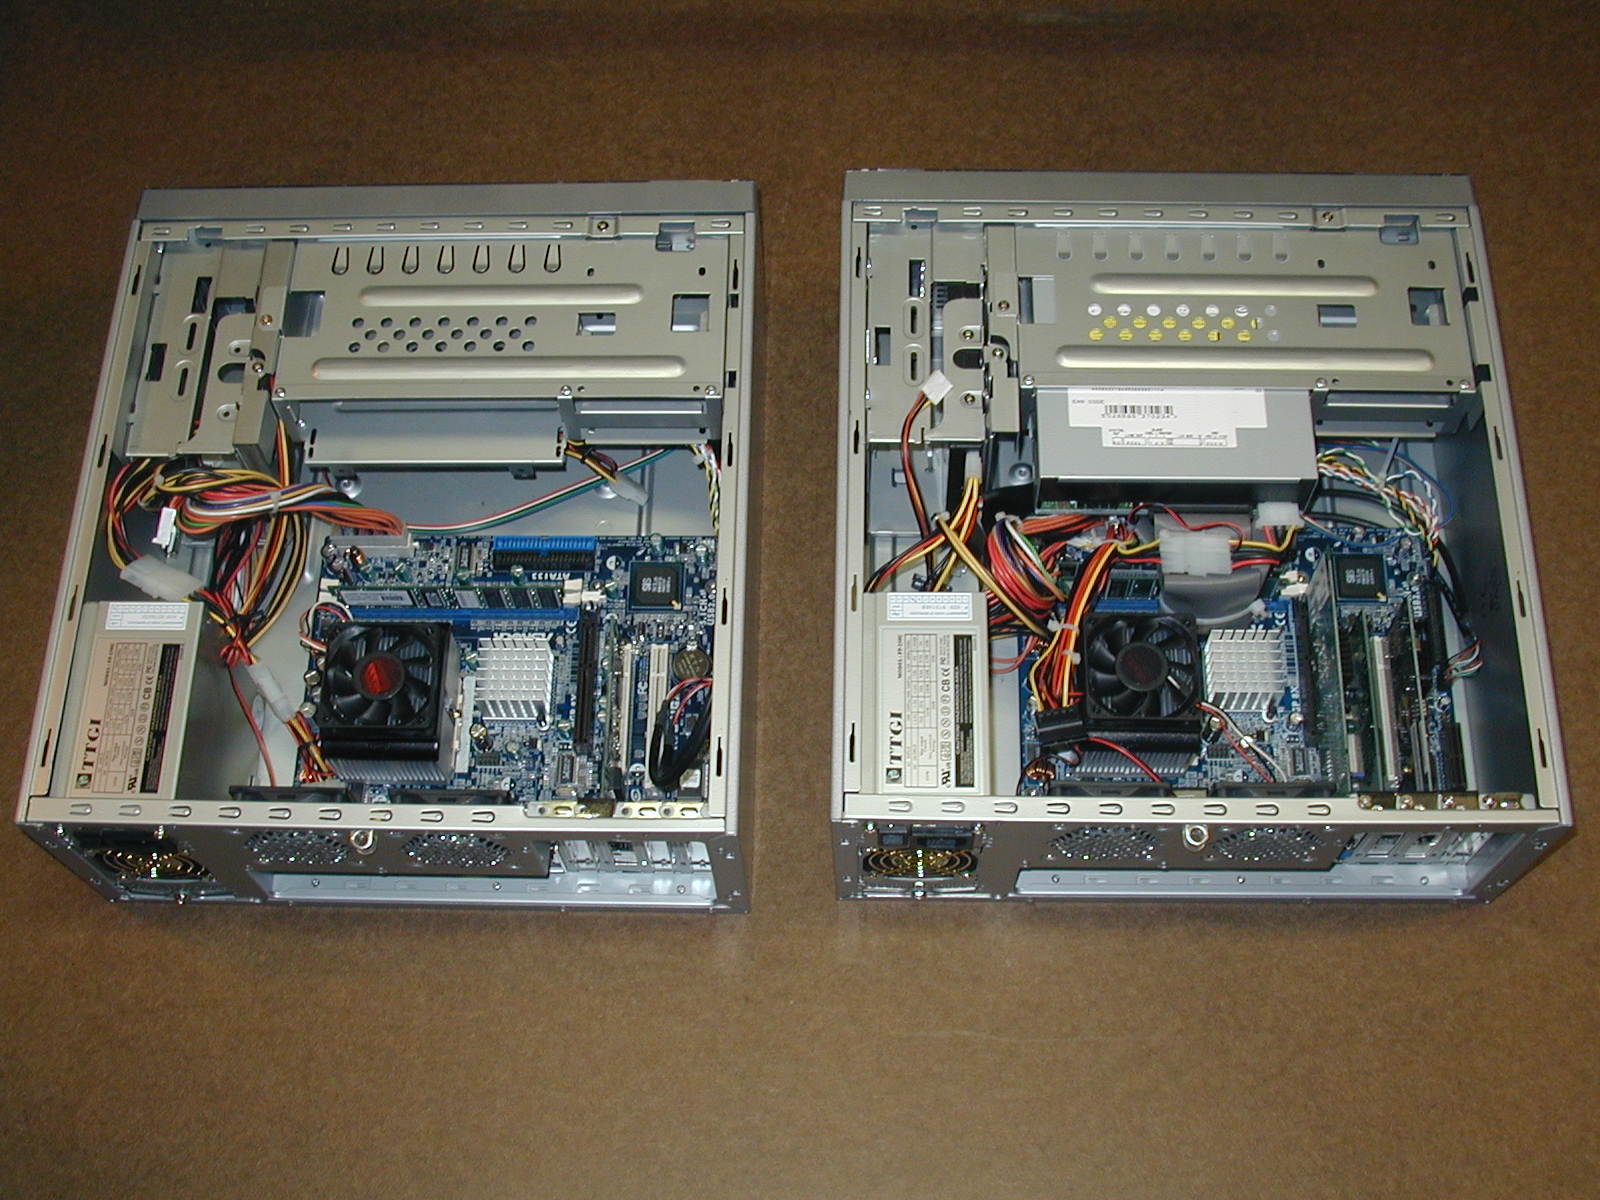
We will talk more about the BIOS next time. Figure Three (large version here shows a picture of the worker and master nodes. As you can see, the worker node has very little in it. Once you have the head node powered up, you may want to attach the USB floppy and run Memtest-86. This program will test the memory and detect any problems with your system. We recommend running MemTest86 for at least an hour on each machine (several hours is better). This step is very important because, it helps assure us that the memory subsystem is working correctly. We have found that mixing DIMMs from various manufactures can cause problems.

Building the Worker Nodes
Once you have completed the Head node, the worker nodes should be easy. Do everything you did for the head node except don't install the DVD, video card, extra FastE NIC, or hard drive (which should be easy because you should not have the parts!). Repeat this process seven times.
Power-Up
Power management is not that difficult with the right combination of plug strips. Before we get into the details, however, let's talk about power requirements. Using a trusty "Kill-a-Watt" power meter, we measured the total wattage for the cluster to be around 650 Watts. You should be able to use standard electrical service to power the cluster. Keep in mind, however, if you are paying the electric bill, you may not want to keep the cluster running all the time. We will present some power saving strategies in a future installment.

As far as the physical wiring is concerned, Figure Four illustrates the wiring plan we used for the wire racks. Plug strips 1 and 2 are the simple six outlet strips mentioned in the sidebar. Plug strip 3 is the Belkin SurgeMaster. Be aware that in some localities, the practice of cascading plug strips can be considered dangerous. Make sure your comply with all local codes and insurance requirements.

Rack'em and Stack'em
Now comes the fun part. Placing the nodes on the wire rack will give you a real sense of accomplishment. Unfortunately, we are are not quite done.
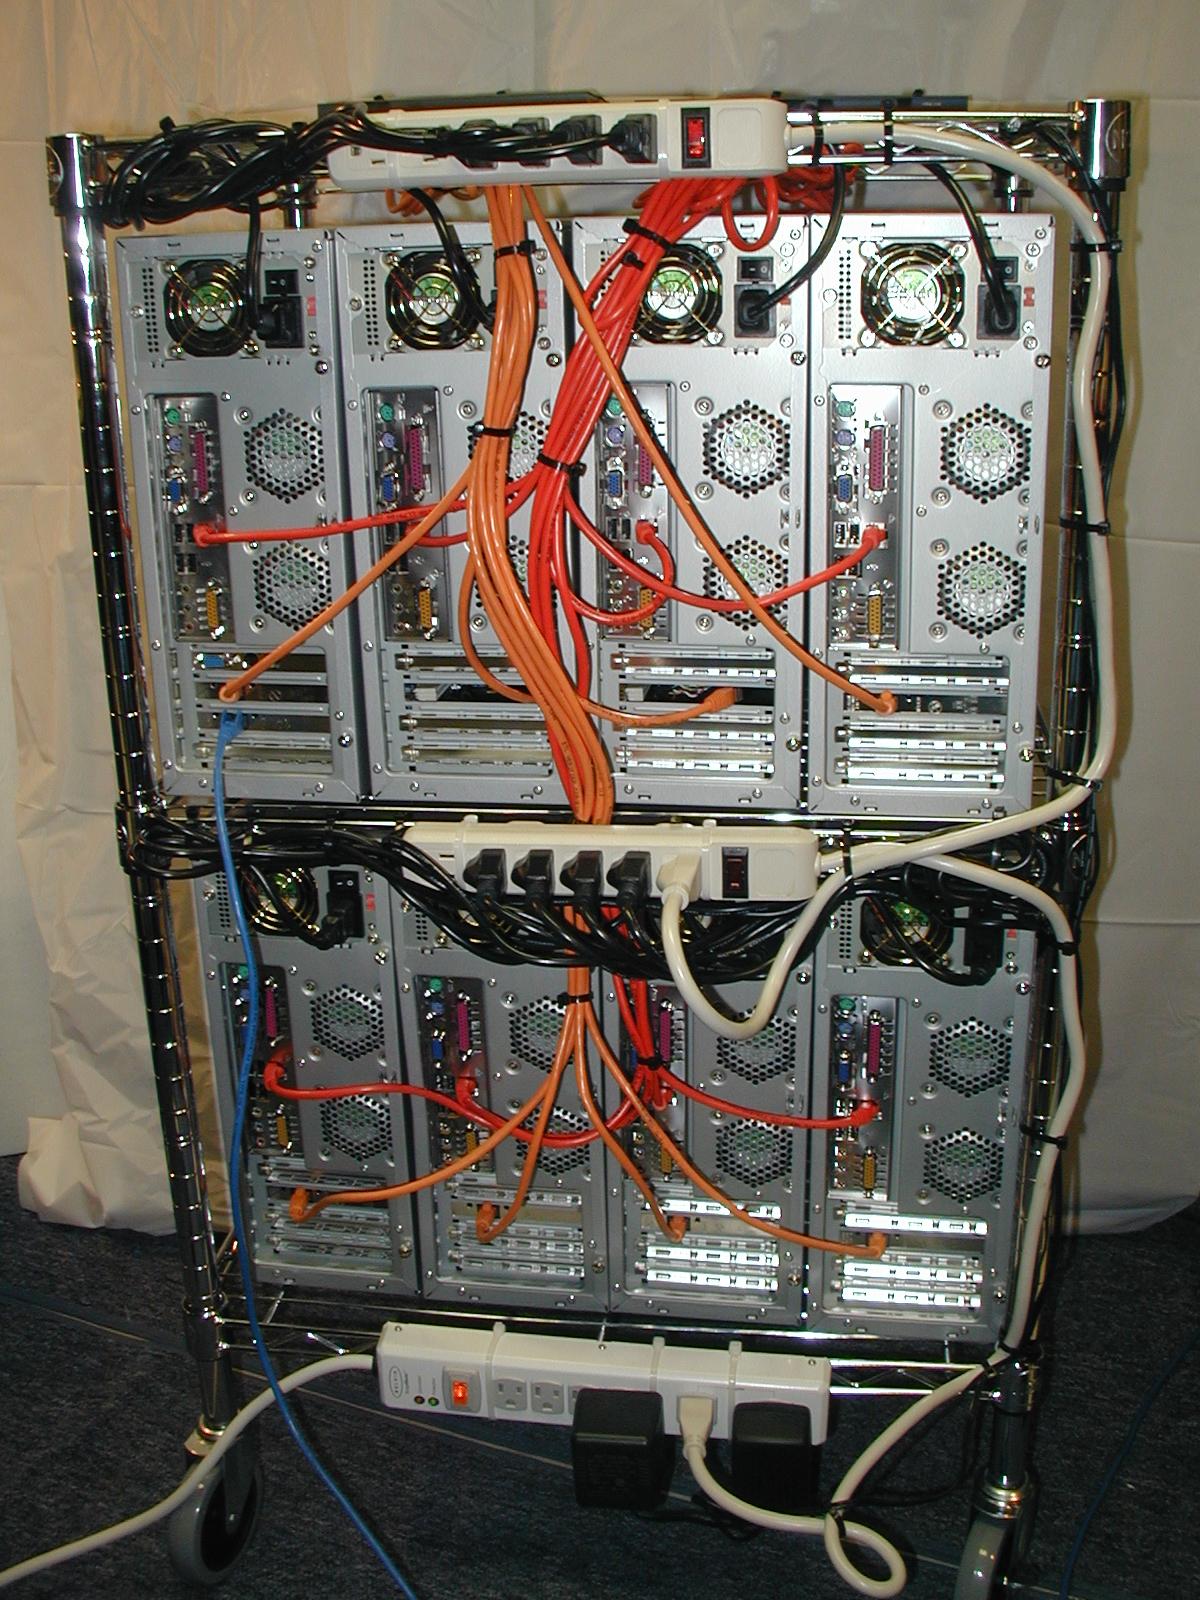
Figure Five (click here for larger version) shows the back of the cluster. As you can see, there are plenty of wires that need organizing. The white cords are the power-strips (three total), the black cords are the power cords for the nodes, the red cables are the Fast Ethernet cables, the orange cables are the Gigabit Ethernet cables. The single blue cable it the local LAN cable. Note: the middle two nodes are missing their Gigabit NICs (they were DOA). The black bands around the cables are plastic 7 inch "zip" wire ties. These are very good at bundling cables and attaching cables to the wire rack. We used white cables ties to secure the power strips. You can find these wire ties at Home Depot or Lowes.
Bundling cables is an art. We find that if we do a rough layout with a few wire ties, then go back and do a final pass it is much easier than doing it all at once. That is, we end up clipping the first set of wire ties after the second set is secure. In addition, you may have missed a wire or not include all the wires in your first pass. Also, a pair of wire cutters works real well to remove old wire ties and trim the edges off the permanent ones.
You can also see the placement of plug strips on each shelf. The top two plug strips are plain (no protection) strips. The lower strip has surge protection. To avoid large bundles of wires, we plugged the top row of nodes into the top plug strip and the second row into the the middle plug strip (only top plugs shown). The bottom plug strip has room for the switch DC power supplies and the two node plug strips. Also note, the there are extra "receptacles available" on the cluster (do not overload, however). These are important if you want to add an administration monitor to the top of the rack -- or anything else for that matter. The goal, however, was to have one power cord for the whole cluster.

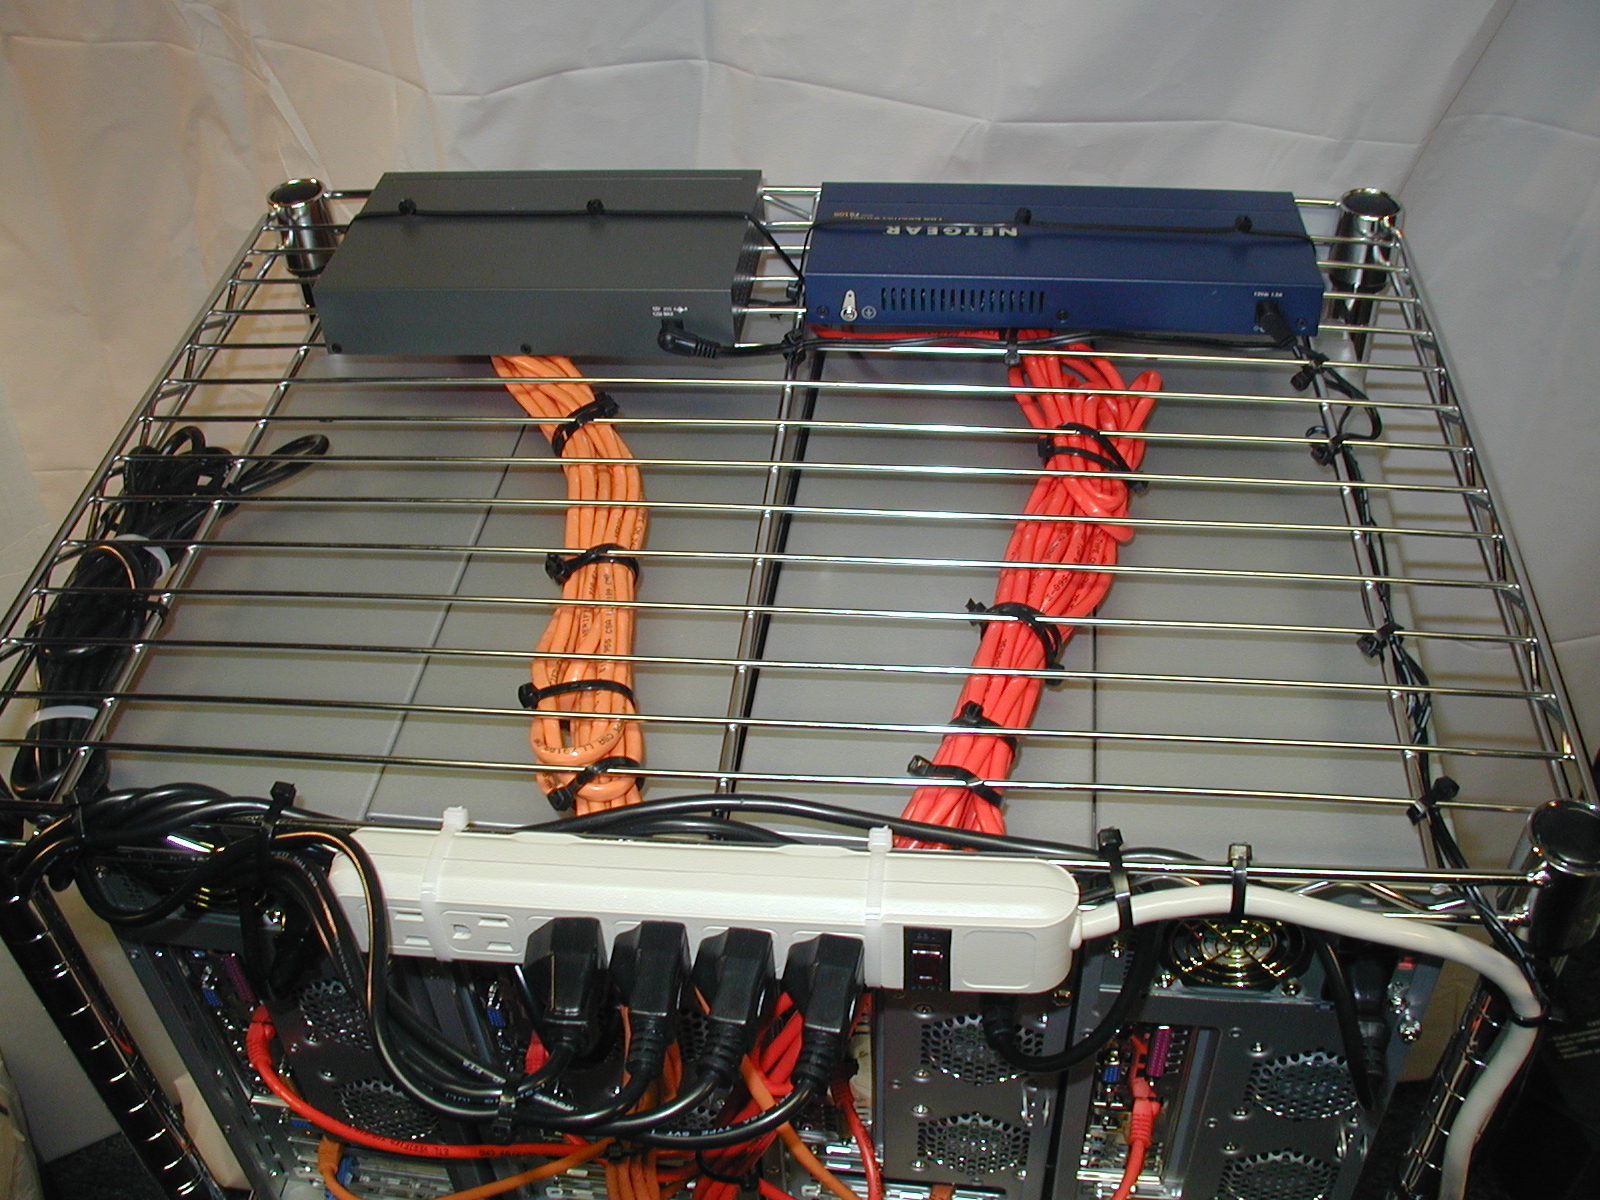
Figure Six (click here for larger version) is a top view of the cluster (from the back). First, you can see the two big cable bundles going to their respective switch. (Note: We used a Netgear FastE switch instead of the SMC switch mentioned in the Sidebar -- we had one laying around.) Use the 3-foot cables for the top row of systems and the 7-foot cables for the bottom row of systems. Also, note that the switches are secured to the rack using the trusty wire ties (connected together to form a longer tie).
Finally, you may notice that the switches face the front or the cluster. One could argue that placing them in the back would be more efficient in terms of running wires. I prefer to see the switches when the cluster is operating (such a luxury is not often the case with large clusters). Interestingly, programs often have unique communication patterns. By observing the switch lights, you can often get a feel how well a program is running. i.e. you can often see a problem by observing the communication pattern. Plus it will impress your friends.
Figure Seven (click here for larger version) is a final front view of Kronos.

That Is Enough For Today Class
That is about it for now. In part two of this series, we will be configuring the BIOS and installing the software. Until then, good luck, and send us any questions. Do we still sound crazy?
| Sidebar Resources |
| Fedora Linux |
| Warewulf |
| ASRock Motherboards |
| FreeDOS Boot Diskette |
| Memtest-86 |
| PC Building Guide 1 |
| PC Building Guide 2 |
Douglas Eadline is the swinging Head Monkey at ClusterMonkey.net. Jeffrey Layton is Doug's loyal sidekick and works for Linux Networx during the day and fights cluster crime at night.